Sunday, January 27, 2013

Run Code::Blocks programs using Gnome-Terminal, Konsole etc.

Ok, so we all (mostly) love Code::Blocks. But using the XTerm window (the one you get to test your codes into) is a real pain (for me at least) in the ... Instead I wanted to use the default terminal that I use for commands. Now, I've been a user of Gnome-Terminal for quite sometime and now have shifted to KDE. So now I use Konsole. Finding the exact attribute string is a bit annoying after each install so here's a collection. I'll add more when I use more.
For Konsole:
konsole --workdir $WORKDIR --title $TITLE -e

For Gnome - Terminal
gnome-terminal $TITLE -x

For X-Term
xterm -T $TITLE -e


Credits:
Eragon0605: [ http://ubuntuforums.org/showpost.php?p=9190211&postcount=3 ]
jens: [ http://forums.codeblocks.org/index.php/topic,11245.msg76596.html#msg76596 ]

Saturday, January 26, 2013

Install Intel Drivers on Ubuntu

We all miss games, no matter how much we love our OS, we miss the games more just because playing them on our favorite OS just makes things better. I missed the game Need For Speed: Most Wanted a lot. I had to go into Windows to play that and for every other luxury in the world, had to boot back to Linux. I hated this, for this kept my out of an awesome creation, for it kept me in a very disturbing computing setup, for it reminded me that there was something that stopped Linux from being perfect, for it was just unfair. And all that for what?? I didn't have the drivers for my Graphics module. But now, it's over. :D
To install the Intel drivers in your setup simply do the following.
1. Add the ppa to your sources.list
sudo add-apt-repository ppa:ubuntu-x-swat/x-updates
2. Update the apt
sudo apt-get update
3. Run the upgrade, it also upgrades your other system components, so it's reasonably big. Mine was around 500 MB
sudo apt-get dist-upgrade

After it's done, reboot your machine. Now run the game using Wine. Enjoy, and shout it out loud.
Linux FTW, the best OS to ever exist

[Linux/Ubuntu][Fix] MATLAB on an NTFS Partition

To start with, I was in a huge mess yesterday because today was my Image Processing exam and all of a sudden, MATLAB wasn't working on my computer (Linux Mint). Apart from installing in a Windows partition, everything was exactly the same as the last one and I didn't have a Windows version to go to. It started throwing all sorts of errors related with Java and JVM. 4 hours from the exam I still didn't have any luck, when all of a sudden searching with the Error strings, I hit an Ubuntu forums page describing the same scenario as mine. MATLAB on an NTFS Partition. This was also the first time I used the fstab file in Linux.
Source: [ http://ubuntuforums.org/showthread.php?p=10157469#post10157469 ]
First, Linux cannot change permisssions on a Windows filesystem outside of a mount or through fstab. This is the way it's always been. Second, the default permissions set on mounting NTFS partitions through File Manager has changed since Gutsy which is why it used to work and now it doesn't. You will need to automount your partition by adding a line to fstab so that you can force the permissions you want. The general steps to automount are as follows:
[1] Go back to File Manager and unmount the drive (Or use a command, your choice. Generally I use
sudo umount /media/<partition-name>

[2] Create a permanent mount point for the partition
sudo mkdir /media/NTFS1

[3] Find out how you system sees your partition
sudo blkid -c /dev/null

You'll get something that looks like this:
/dev/sda2: LABEL="WinXP2" UUID="DA9056C19056A3B3" TYPE="ntfs"

[4] Using the info above as an example you would add a line in fstab that looks like this:
/dev/sda2 /media/NTFS1 ntfs defaults 0 0

This might be a bit different for your system. Just open the fstab file using nano, using
sudo nano /etc/fstab

and see how your system lists them. If your system uses UUID, replace the first part with the UUID
UUID=DA9056C19056A3B3 /media/NTFS1 ntfs defaults 0 0

[5] Running the following command will check for errors and mount the partition:
sudo mount -a
That, should do it. Now try running MATLAB. Hopefully there won't be any errors.

Thursday, January 03, 2013

Segment Tree [Tutorials]

Some of the links are shortened because some Google services are blocked in my country. So I have to use proxies that generate Long links.
1. Tutorial 1

Tuesday, January 01, 2013

Mounting NTFS in Xperia Neo V via USB-OTG (Read / Write both)

For newer devices (I don't know how to categorize them, maybe 2012 devices) it's easy to mount any filesystem in both R/W mood for Xperia series. But a little older devices (maybe all the others?) it's not so easy. Some support it partially and some don't (totally). My phone is Xperia Neo V and it doesn't seem to support that. Had a hard time to find this workaround but it's effective, FINALLY !!! :D
To mount NTFS in full support you need two things. A set of modules and the mount script. How to do that follows.
Pre-requisites:
1. Rooted device (you can find tutorials on that)
2. CWM installed (you can use X-Parts from Play Store
3. Script Manager

Steps:
1. First download this file. It is the ntfs-3g modules set compiled for Android.
2. Copy the zip to your SD-Card, in a folder that you can easily recognize by name
3. Reboot into recovery, to do this first turn your phone off. Then power it up and wait for the Sony Logo. When it comes keep pressing the volume down key repeatedly (the key maybe different for another device, do a little Googling to know which).
4. Now you're in CWM (hopefully, you'll see screen with a list of things). Choose 'install zip from sdcard'. Choose the zip file from the sdcard. It will show some messages. If all goes well the last line should be something like "....done"
5. Now supposing the modules have been installed correctly copy this script and save it with the name "MountScript.sh" in your SD-card.
#!/system/bin/sh
#
# Mount USB OTG NTFS Storage device - shardul_seth@xda
# Mount point checking added by - tafhim

# load fuse support
if [ ! -e /system/lib/modules/fuse.ko ]; then
 busybox echo -e "WARNING: fuse module not found!\nIs fuse built into kernel?"
else
 insmod /system/lib/modules/fuse.ko 
fi

# mount partitions
sdn=0
ls -l /dev/block/sd??
if [ $? -eq 0 ]; then
 for sd in `ls /dev/block/sd??`; do
  if [ -d "/sdcard/usb_drive_$sdn" ]; then
   umount /sdcard/usb_drive_$sdn
      rm -R /sdcard/usb_drive_$sdn
  fi 
  if [ ! -d "/sdcard/usb_drive_$sdn" ]; then        
   mkdir /sdcard/usb_drive_$sdn
   chmod 777 /sdcard/usb_drive_$sdn
   ntfs-3g -o umask=0 $sd /sdcard/usb_drive_$sdn
   if [ $? -ne 0 ]; then
    busybox mount -o umask=0 $sd /sdcard/usb_drive_$sdn
    echo "$sd mounted on /sdcard/usb_drive_$sdn"
   else
    echo "$sd (NTFS) mounted on /sdcard/usb_drive_$sdn"
   fi
   sdn=`expr $sdn + 1`
   if [ ! -z $SM_VERSION ]; then echo showToastLong "$sdn Drives mounted!" >&$SM_GUIFD; fi
  fi
 done
else
 echo "No drive found! Exiting.."
 if [ ! -z $SM_VERSION ]; then echo showToastLong "No drive found! Exiting.." >&$SM_GUIFD; fi
 exit 1
fi
exit 0
6. Connect your drive using the OTG cable.
7. If not installed download Script Manager from the Play Store. Run it and browse to the place where you saved the script. Select it
8. You don't have to change anything just select the "su" option that has an Android Skull (Pirate-ish) over it. Now select "Run" from the top-most menu.
9. If you see the message "1 drive mounted" or similar, you're done. Just go to the SD-card and drag down and you'll see the folder "usb_drive_0". If you have multiple partitions, all will be mounted.

You need to do all these only the first time. From later on, you only need to follow steps 6-9 only :)

For help on rooting / CWM Installation / etc head over to XDA Developers Forum.
For help on using FlashTool in Linux read this.

Xperia Neo V specific stuff:
Some nice kernels for Xperia Neo V are the Suave Kernel, the Super Stock Kernel and the Alliance Kernel MOD.
You can download kernel .562 and kernel .587 for Xperia Neo V MT11i. You need these to root your device using this method
The DooMLord rooting kit (windows) is available here
The DooMLord rooting kit (linux) is available here
The CWM Installer (windows) is available here
X-Parts apk is available here

Friday, December 28, 2012

Installing and Configuring FlashTool for Xperia Devices in Ubuuntu

I've been constantly switching between my two OSs, Win7 and Linux Mint for just flashing a ROM to my Xperia device. And ofcourse, I hate being in Windows. So, I found this nice little method to do the same in my Linux.
Credits go to these two pages:
http://duopetalflower.blogspot.com/2012/08/flashtool-in-ubuntu-linux.html
http://ubuntuforums.org/showthread.php?t=2084266
1. First of all go to
http://www.flashtool.net/downloads.php
and download the Linux version
2. Extract the 7z then the TAR somewhere and you find the directory FlashTool
3. Now some configuring, first of all you need a package called libusb. By the time you might come to this post the lib may get upgraded so just use your head to handle the scenarios a bit. First off, go to the site
http://libusbx.org
and download the latest tar.bz2 version.
4. Place it somewhere and cd into that directory
5. Type
sudo su
6. You're given root rights, type
tar xvf $(ls | grep "libusb")
This will extract the tar.bz2 file you've downloaded, considering that directory has no other file whose name contains "libusb".
7. Now type
cd $(ls | grep "libusb")
and you'll be inside the extracted directory.
8. Type
$ sudo su
$ ./configure && make && make install && sudo ldconfig
9. Now type this command the configure some USB settings for Flashing interface
sudo cp /etc/udev/rules.d/70-persistent-net.rules /etc/udev/rules.d/80-persistent-usb.rules
10. Open that newly created file in nano using
sudo vi /etc/udev/rules.d/80-persistent-usb.rules
11. Add these lines to the end of the document
SUBSYSTEM=="usb", ACTION=="add", SYSFS{idVendor}=="0fce", SYSFS{idProduct}=="*", MODE="0777"
12. Most of the hard part is done, now just a final installation of the ia32-libs using
 sudo apt-get install ia32-libs 
13. Now you're good to go just go to the directory where your Flash Tool executable is and just type
./FlashTool

Monday, December 24, 2012

Installing openERP in Linux (Ubuntu)

The DEB file supplied by OpenERP site works but you need two extra packages. So, first run this command.
sudo apt-get install postgresql-common postgresql-9.1
Then do the
sudo dpkg -i [the deb file]
In case you find some dependency issues just use
sudo apt-get -f install
Afterward you can access openerp in
http://localhost:8069/web/webclient/home
Use the username: openpg
password: openpgpwd
The default admin password or the Master password is: admin

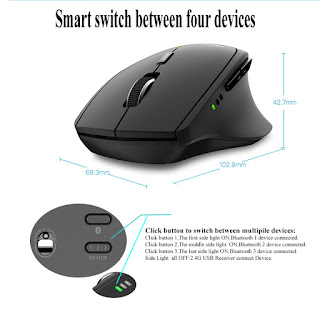
Connect Rapoo MT750S with Linux (Tested on Manjaro)

 I bought this obvious copy of MX Master 2S in hopes of having the device switching functionality along with a lightweight body because I ha...